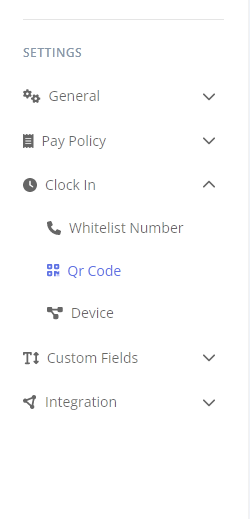
To create a QR Code in SimpliTime you should follow the steps below:
- Log into SimpliTime
- Navigate to QR Clock feature by expanding theClock Initem in the left sidebar.
- Upon clicking on the Clock In, a dropdown with three items is displayed. Click on the QR Code item to open the QR Code page.

- To create (add) a new QR Code click on the ADD button on the top right corner. Upon clicking on the ADD button a “Add new QR Code” menu will be displayed on the right side of the platform.
- On the “Add new QR Code” menu’s fields enter the following information:
- Description – enter the name of the QR Code (may be a combination of location + name of the building, ex. PISE-AL – YMCA Greystone)
- Location – select the location from the available options in the dropdown
- Timezone – select the time zone from the available options in the dropdown (ex. (UTC -06:00) America/Chicago)
- Search Places – to draw the geofence for the location follow the steps below:
- Enter the exact address of the building. Upon entering the address, the system will display one or more options from google map. If there are more than one option, select the most accurate one.
Upon selecting the address from the dropdown, the map will be repositioned to the location of the building. - Draw the geofence by creating a rectangle inside the map. To create a rectangle, you should link lines between 4 points in the map.
So, start from clicking on the left upper angle, and link it by clicking on the right upper angle, and then continue to link the lines by clicking below on the lower right angle and then on the lower left angle, and finish the rectangle by linking it to the starting point on the right upper angle.
*Note that the rectangle should be closed circle, in order to be finished (See the image below).
- Enter the exact address of the building. Upon entering the address, the system will display one or more options from google map. If there are more than one option, select the most accurate one.
- Subaccount – Enter the subaccount. The subaccount should be comprised of numbers only. Remove any dashes if there are any.
- Select Status (active/passive)
- Enable or Disable “Activate to take profile image when clocking out”
- Enable or Disable “Collect ip address every time employee clock in or clock out”
- Enable or Disable “Activate to sign shift when clocking out”
- Click SAVE to save the changes.
